Map Reading Basics Part one
Map reading is not only an important addition to your outdoor knowledge but is important to keeping you safe. Plus, basic navigation skills are not only important but learning to navigate makes days on the hill more enjoyable, lets you find out more about the landscape around you and is also good fun. A map can allow you to accurately plan a journey, giving a good idea of landmarks and features you will pass along the route, as well as how far you will be travelling. A good way of getting to know how a map work, it's symbols and markings it to take one out on with you on a walk you know.
Most Ordnance Survey (OS) maps are either 1:25 000 (4cm to 1km) or 1:50 000 (2cm to 1km).For any detailed navigation and for more accuracy, we suggest using an OS 1:25 000 map.
Basics
A map is a flat plan showing the landscape as it would be seen from above.
Maps are used to navigate when you're heading out for a walk and an essential item to take when heading into the hills and mountains. Even when you've been to a place hundreds of times, a map is super important so you cn navigate in poor visibility or at night.
Each map scales down the landscape to condense and create an accurate plan of the land but much smaller.
Maps have a range of symbols to show where an what certain things are and each map includes a key to what these symbols mean but over time, you will learn what each icon, symbol and line means.
A couple of useful links to learn more about map reading are:
Navigation | Mountaineering Scotland
UKH Articles - Beginner's Navigation: Tips, Tricks and Exercises (ukhillwalking.com)

Grid Reference
Ordnance Survey maps are covered in a series of faint blue lines that make up a grid. The lines have numbers which allow you to pinpoint your exact location for example to direct Mountain Rescue. The numbers along the bottom are the Eastings and the vertical numbers are Northings. When giving a grid reference, you give the Eastings first and then the Northings. A good way to remember this is ALONG THE CORRIDOR AND UP THE STAIRS.
The simplest form is the 4‑figure grid reference which is the two number from the eastings / bottom and then the two numbers from the northings / side. This 4‑figure grid reference will reference a single square on the map. To be more accurate, you can then give a 6‑figure grid references. Here, each square is divided up into tenths.
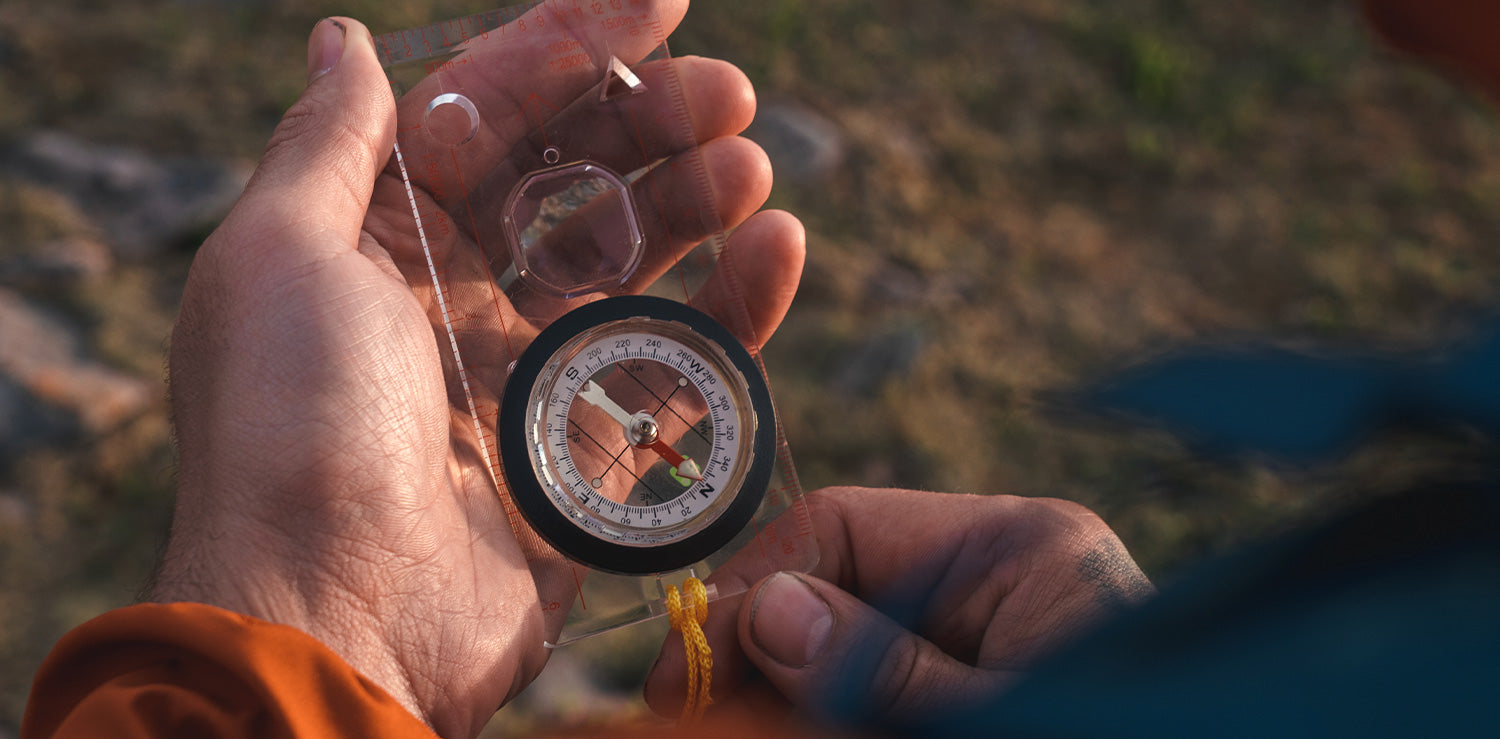
Know Your Compass
1. Baseplate
2. Templates
3. Direction-of-Travel Arrow
4. Magnifier
5. Ruler
6. Romer Scales
7. Graduations
8. Orienting Lines
9. Compass needle
10. Rotating bezel / Housing
11. Sighting wire
12. Sighting slot and lens
Romer scales are also often displayed on a compass so use when plotting points on the grid to assist in getting accurate 6 figure grid references. 
There are three norths.
Magnetic North (MN). The compass needle points to magnetic north.
Grid North (GN). The north-south (vertical) grid lines point to grid north at the top of the map. Grid north is not a place, just the direction of all the grid lines.
True North (TN). This is the direction to the North Pole.
For normal map reading purposes we can ignore true north, we are only concerned with magnetic north and grid north.
Contour Line
As we know, the landscape isn't flat. To represent this on the paper map, the height and shape of the land is shown on a map using ‘contour lines’. The number tells you the height above sea level of that line. The height difference between the contour lines is 10 metres, although it will be 5 metres in flatter areas.
Being able to visualise the shape of the landscape by looking at the contour lines of a map is very important so you can not only plan the best route for your journey but also keep away from dangerous or inaccessible routes. The closer together the contour lines, the steeper the slope of the hill. If a hill is very steep the contour lines might even merge into each other.

Using Your Compass
Plotting a magnetic bearing on the map.
Bearings** are directions measured CLOCKWISE from magnetic north and grid north. In the military, we give accurate directions using the MILS system. Degrees are not normally used, although it is useful to understand.
On the ground - A Magnetic Bearing is measured CLOCKWISE. (360 Degrees = 6400 mils)

Step One
From your starting point on the map, place the index line on an imaginary line between where you are now and where you want to go – with the direction of travel arrow on the base plate pointing that way.
Step Two
Holding the baseplate in place, rotate the compass bezel so the orienting arrow lines up with grid north on the map. The orienting lines should be parallel with the vertical blue grid lines (northings).
Step Three
Take your compass off the map. Hold your compass flat at waist height and turn yourself until the red needle meets up with the letter N and is positioned over the orienting arrow. Pick a landmark in the distance which is in the direction of travel and head to that. When at that location, check your location on the map and repeat the process until you arrive at your final destination.
Direction can be given as a general compass direction: north (N), south (S), east (E), west (W), north-east, south-east, etc. When you know which direction is north then we can find other directions.

Direction
There is no such thing as a ‘’sense of direction’’- just good observational skills. For instance, noticing the direction of rivers, streams, roads, and the ‘lie of the land’-hills, valleys, ridges, the shape of forest blocks, the direction of sand dunes, ice pressure ridges, etc. You DO need to know where you are (GPS can help!) Look around at everything you can see on the ground, so that when you look at your map all that you have seen MAY be able to be seen on the map. You are SHAPE MATCHING - shapes and features on the ground with what is on the map.

DDCRAPS
Set your map either by compass, feature or linear feature, alignment, or by sun or stars. Having set your map, study it and relate the map with the ground. Remember – SHAPE MATCHING and something you may already know, DDCRAPS.
Direction When your map is set, directions on the ground will match the same directions on the map. In which direction have you been moving?
Distance If you can roughly estimate distances on the ground, then those distances should be similar on the map. How far have you travelled? How far away/ How close is that feature?
Conventional Signs Features on the ground may well be shown by conventional signs on the map. Knowing the map legend will speed up your work.
Relief The features that you see on the ground must be able to be matched with those on the map. What is in front/ behind/ to the sides? High / Low ground? Hills/ valleys/ re-entrants/ ridges/ etc?
Alignment If you are lucky, features that line up on the ground will line up on the map. Look both at the ground and at the map!
Proximity Nearness. Features close by each other on the ground have to be close by each other on the map. Check!
Shape The shape of features on the ground will be replicated on the map. Woods, wood corners, bends in tracks/roads, lakes, (even hedge lines and walls on large scale maps).


